How to Use Your Windows Laptop of PC As a Wifi Hotspot

You’d have to spend a long time digging into Windows before you reached the end of all the features and functions it has to offer—and one of the lesser-known capabilities of the operating system is being able to act as a wifi hotspot, so other devices can connect to it and get online through the same network connection.
There are numerous times when this might be helpful. Maybe you’re traveling and your laptop is connected to a cell network—in which case you can create a hotspot and hook up your tablet and your Kindle as well, which don’t have cellular connectivity.
Or maybe you struggle to get wifi into every corner of your house: Your laptop or desktop PC can act as an extender, sharing a wifi or Ethernet connection with anything around it, and going beyond the range of the router you’ve got installed.
There is a little wrinkle in terms of the wifi extender scenario, because the hotspot network created by Windows will be separate from the one created by your router—so you’ll have two wifi networks at home, not just one—but it’s not too much of an inconvenience, and certainly doesn’t detract from the benefits of doing this.
How to create a hotspot on Windows

Configuring your hotspot.
Credit: Lifehacker
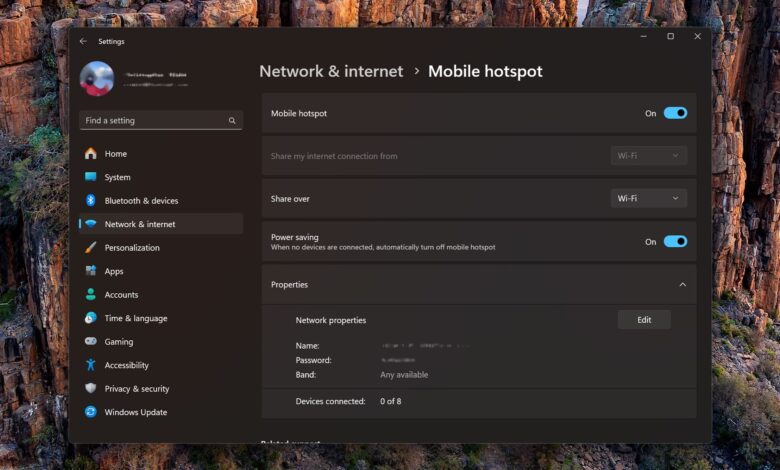
Open Settings from the Start menu, then choose Network & internet and Mobile hotspot. From the Share my internet connection from the drop-down menu, you can choose which of your computer’s internet connections you want to use as the basis of the hotspot: You may only have one, but it’s possible your laptop or desktop PC is hooked up to both wifi and Ethernet, for example.
Click Share over to set how the internet connection is shared: Wifi is going to be the best choice for most scenarios, but you can also share online access via Bluetooth if you need to. Right below that there’s a toggle switch for turning Power saving on or off—if it’s switched on, the hotspot automatically turns off after a while if no devices are connected.
Under the Properties heading you’ll see the details of the wifi hotspot you’re creating (click the small arrow to the right if they’re not already visible). Click Edit to set your own network name and password, or you can leave the defaults in place—you’re going to need these details for connecting other devices. On some PCs, depending on your hardware, you’ll also get the choice of broadcasting the network over the slower, longer range 2.4GHz band, or the faster, shorter range 5GHz.
All that’s left is to turn on the Mobile hotspot toggle switch at the top of the window, and your wifi hotspot is enabled—you can then connect other devices using the login credentials you’ve already specified. From trying to get more devices online in a hotel room without having to register them individually, or wanting to get wifi coverage extended into the finished attic, it’s a Windows feature you might find more useful than you originally thought.


