It is my wish that this article will have you falling in love with one of the most beautiful, serene, and often meditative creative experiences there is …..
‘Life Drawing’ – described as drawing or painting the human figure, traditionally nude, from the observation of a live model’
In my opinion being given the opportunity to observe another human in the flesh with the soul purpose of translating what one sees into a series of lines, gestures, shapes, light, shade and curves is an honour and an experience that leaves one humbled, inspired and ambitious to try again and again to do justice to the complexity of the human form.
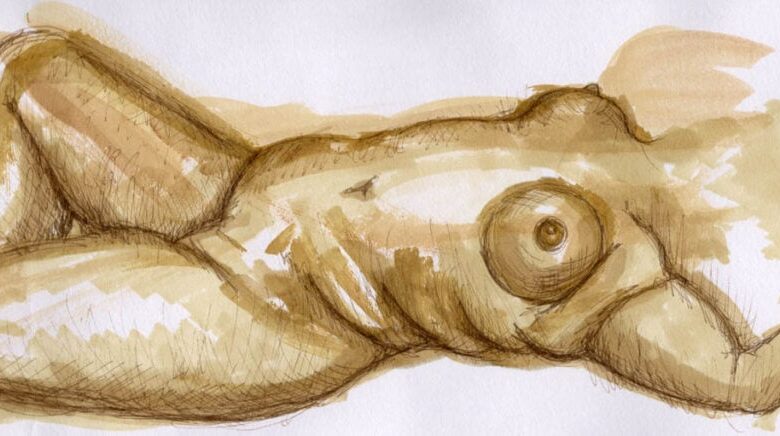
Here I will share examples of my own observations, punctuating this article with a variety of studies in the hope to inspire you as we go.

I will encourage you to take a look at some of the Old Masters of life drawing and painting throughout history, so that you may become familiar with a variety of approaches, styles and the limitless possibilities that this subject has to offer you.
If you feel you will take some convincing that you too can fall in love with the process of life drawing, finding it joyous and not overly daunting or perplexing, relaxing even, then please do read on.
By the end, I truly hope to have you looking to find your nearest life drawing opportunity.
I feel it is imperative to talk you through what to expect from your first life drawing experience, helping to dispel any nerves you might be feeling about drawing a human being’s naked form.
Helping to quash some myths, I will put you at ease and get you feeling absolutely prepared with the right kit and the optimum mindset for getting the most out of your life drawing sessions.
Whether you have experienced the Art of life drawing before or if you are going to be trying it out for the first time, here, I will help you to feel well equipped with advice on the creative medium best to experiment with. Also, I will offer advice on gathering the right tools to get you comfortably set up.
I want you to feel ready to find the special kind of freedom of expression that can only be sought through observing the human form.

The History of Life Drawing
The practice of life drawing is steeped in history, controversy and tradition. Without it we wouldn’t have a rich and beautiful plethora of historical paintings by the Old Master Painters. Take for example Sandro Botticelli’s Birth of Venus 1484 – 1486 housed in the Uffizi Gallery in Florence Italy, neither would we be able to gaze upwards in awe to experience the most magnificent example of a Fresco painting dating 1508 – 1512 by Michelangelo, the ‘Creation of Adam’ which forms part of the ceiling of The Sistine Chapel and is located in The Vatican City in Rome.
Our world would be a less fascinating place without the magnificent, iconic sculptures that came about after hours of studying human autonomy and form, like the ones that make up the dramatic scene that is the Iconic Trevi Fountain in Rome. We would also be without the Classical sculptures of Ancient Greece and the shape of Art history would be very much different.
Take some time to research online the examples that I have given you and also take a look at the Life Drawing Academy.
The Life Drawing Academy online has a great section detailing work from The Great Historical Masters to works by their contemporary figurative Artists and Teachers.
Now, I don’t wish you to feel overwhelmed by these references, just simply aware of them and also informed by them.
Furthermore, I feel that any budding Artist should spend some time reading about and considering the work of Leonardo Da Vinci, to whom so much in Art history is owed.
The fascinating investigations that Da Vinci carried out began in 1506 with the dissection of a man who had lived to a grand age of 100 years and had passed away peacefully in Da Vinci’s presence. His drawings that resulted from the careful dissection procedure showed a deep unearthing and resulting understanding of the body’s structure and the function of what lies beneath our skin.

You might also wish to take a look at examples of work by a few of my favourite artists:
Gustav Klimt 1862 – 1918 – produced stylised interpretations of humans, male and females, partly covered by patterns, partly erotic and decadently decorative. I have loved his combination of the human form and rich textural compositions since my A Level Art studies.
Peter Paul Rubens – Flemish Baroque Artist 1577-1640 painted powerful compositions, laden with male and female forms and dramatic dynamic scenes possessing great energy and purpose.
William – Adolphe Bouguereau French Artist 1825 – 1905 produced sensitive and beautiful depictions of the naked form, a man whose paintings were in demand by the wealthy but whose work was also highly critiqued. I love the light in his paintings and the luminous quality to the fair skin of his subjects.
Life Modelling – Speaking From Experience
It would be true to say that I have the utmost respect for those who work as professional life models at any time in their life.
My first experience working as a life model wasn’t nerve wracking or awkward, instead it was meditative, beautiful and liberating.
The highlight of my first sitting was the opportunity to re-gown every now and again between timed poses to take a walk around the room, to chat with the Art group and observe the drawings that the lovely gathering of female artists had been creating.

I was genuinely overwhelmed and extremely humbled by their careful observations, there were playful representations, energetic interpretations and respectful stylised expressions within those drawings. It was inspiring how all of them were so unique and so different but remarkably all bearing a true likeness to me.
Sitting, standing and laying to pose for this dedicated group of ladies for 3 sessions was one so very positive for me that I went on to model for 2 A Level Art groups and to give younger students the opportunity and experience of Life drawing.
All of the sessions I modelled for were led by my wonderful friend and talented fellow Art practitioner and teacher Anna.
We studied together at Art college, now some years ago and our connection means that we work together quite intuitively to give students the most positive experience we can.
You only have to look at our smiles and their drawings to know that a serene and beautiful experience was had by all.

What You Need To Know For Your First Life Drawing Class
Remember this as you approach the prospect of attending a class:
Life Drawing is predominantly a celebration of the human form. It is a pleasure and an honour to observe another human in the flesh with the intent of capturing their form, essence, presence and proportion of their body through our own creativity.
It is a wonderful challenge to depict dynamic movement, to consider our autonomy and structure and to have a subject to draw in front of us that is made of flesh and blood, water, bone and muscles and to have another human hold posture and gesture for us to draw.
When you decide to take the leap and book into your first Life Drawing class or if you haven’t attended one in some time and you are a little rusty, it is natural to feel a little shyness or perhaps even fearful.
You may worry that others attending the class will make better studies than you, that they may have a more practised and better understanding of human autonomy.
Remind yourself that you are giving your creative self a wonderful gift and an opportunity to delve into an area of art practice that can bring a great sense of fulfilment.
Every artist has to start somewhere and I have seen some very beautiful studies made by students just starting out on this journey. You have every chance of progressing and building technique, improving your observational skills and gaining a more technical knowledge, but those first tentative drawings and sketches can absolutely be a joy to look back on as you continue your life drawing journey.
A good Life Drawing class shows complete respectfulness towards a model and towards each other.
Although you don’t want to overthink and feel awkward about your model being completely bare in front of you, take a moment to consider that they are a working professional, choosing to give you the opportunity to study their curves and their flesh, their shape and all that in physical terms makes them a unique human being.
A good way to get your head around getting started is looking at your model simply as a subject to draw looking for light and shade, shape and form.
I can guarantee you that once you are into your first half an hour of a class, your thoughts will be focused on making marks on your paper and your soul filled with an eagerness to do justice to your sitter.
Please don’t be tempted to take any photographs during your session, you can only capture images through your artwork and nothing else, a good rule is to switch your phone to Do not Disturb and pop it safely away before even entering the room.
It is imperative to be on time to your session, getting there in plenty of time to set up your area so that you feel comfortable to work. Make sure that you have a good view of the model that isn’t obscured by another artist, easel or prop that may be in the room.
Once everyone is set up and ready and the model is poised to de-gown and pose, it is respectful for everyone to be silent unless you are quietly speaking with your tutor and they are advising you at any point.

Tutors, teachers and artists who run these courses will often put on some music to fit the nature of the class, music can often help to add to and encourage the type of energy that you put into your drawings. Having classical music play, particularly when working on longer pieces is wonderful and can be quite meditative for both artist and model.
You and the other artists will wish to concentrate completely on your artistry and the model will often take the chance to lower their gaze and go into a kind of meditative state (I know that I took the opportunity to do this and it really helped to make best use of the time to be still)
Holding poses is in itself an art form, it takes strength and determination to attain good posture and to maintain it especially when standing and offering more dynamic poses.
Be open to experimentation with your drawings and be prepared to practice. I really encourage you to attend more than one session, a regular class is ideal.
Most classes will take regular breaks where the model can regrown, stretch and take refreshment and walk around. You will get a chance to do the same.
When we are drawing with intent, we can hold ourselves differently and we need to remember to breathe deeply and to stretch out our arms, fingers, neck, back and limbs when we can. This is best done when you are on a break so that you don’t move too far and lose your angle of study which can be very confusing.
Be curious, be inquisitive and open to learning from others, from your tutor, from your model and give it time.
A good Life Drawing Model will be able to hold a pose and offer a varied range of poses. They won’t appear to be self continuous which will help to put you at ease (that said, everyone is allowed a first time for everything so be open, kind and patient if this is the case).

Warming up
Most classes and sessions will start with short 2-5 minute poses, this is an excellent opportunity to get into a flow, to lose any nerves and simply get started.
Tip: I love to start with a paintbrush and just one colour of paint. Starting on a large piece of paper gives you the freedom to go big, producing flowing lines following the shapes and contours of the body. I also look at the distribution of weight, for example, the model may be holding most of her weight on her right leg and have her left leg gently stretched out in front and lightly pointing her toe.

In this case, I would start by drawing her right leg and go from there.
If you just don’t wish to go Big ….
You may wish to try sketching in a biro pen, working in an A3 sketchbook with a hard cover for example. I love this drawing technique as a biro pen runs smoothly along the surface of my paper and allows me to work quickly.

Finding your flow
Next, your model is quite likely to have some medium length poses prepared, around 5 – 10 minutes long so that you may start to experiment and try out different media.
Tip: As well as posture and form, start to consider where the light falls on the muscles and skin and where shadow is formed.
Aim to keep that looseness and flow that the quicker studies encouraged.
If you are worried about tightening up too soon, this would be a good time to experiment with working with charcoal on white paper or to fill your white paper with grey, rubbing graphite all over its surface. You can then use a soft putty rubber to erase the areas of light on the body.

Artistic Development
Often, during the second half of a class, the model will provide one or two longer poses, these may be seated or lying down and last between 20 – 40 minutes.
Again, try not to lose the feeling of spontaneity, flow, flesh and freedom whilst you take this opportunity of working towards a more detailed piece or two.

Achieving good proportions
Faces, hands, feet and fingers are all challenging to draw and paint, particularly in circumstances where one faces making artistic representation of them all in one sitting or in one piece of work.
Tip: Try not to get bogged down in detail too soon. Work using several sketchy lines and marks, constantly ask yourself questions about the shapes, lines and shadows that you see.
Notice how each limb connects to another, several parts of the body may be in contact with the floor, a chair or fabric.
Choose your starting point carefully, you don’t have to achieve the whole entirety of the figure, you could choose a section.
Make approximate marks first and then strengthen your lines as you make definite decisions.
Focus on the main limbs and the positioning and angle of the head if you are including it. Many Artists studying life drawing choose not to include the face initially. Remember that hands and feet take practice too especially if foreshortening is at play.

Edgar Degas 1834 – 1917 famous for his stunning depictions of ballerinas dancing for instance, painted dancers in poses that often obscured their hands or using angels that didn’t require painting the whole hand, so don’t feel pressured to master everything at once.
Your first few experiences of life drawing will be about learning to notice and record the main limbs and proportions of the body and also thinking about how we fit together and how we take up a space where we stand, sit or lay.
Essential Equipment and Choosing Your Tools and Media
Basic beginners life drawing kit
Where and what to start with, what to have to hand:
- A3 Sketchpad with 250gsm paper
- A big roll of paper (wallpaper lining paper is a great choice)
- Stick of charcoal
- Fixative (for use at home or outside after your session)
- A black biro pen or a few colours of biro pen
- A large paintbrush and one colour of paint or ink and a medium sized brush that feels comfortable in your hand and who’s bristles finish at a point
- A tube to roll up and carry drawings home or
- An A3 Art folder to carry drawings home
Your second life Drawing Class and Beyond
Attending just one class or session will give you a great understanding of what’s involved. You may have a wonderful teacher to guide you or you may be attending a group where artists are free to set themselves up, choose exactly what media they wish to work with and how they wish to sit and work or stand at an easel.
You will have had the chance to observe others working, ideally, noticing Artists working in a variety of media and you will have got a feel for what feels good for you to work in.
By your second, third class and beyond, you might wish to choose from the longer list below of my suggested items and really find out what suits you best for this discipline:

- Paint – choose from watercolour, gouache, acrylic or oils
- Brushes – a variety of sizes suited to our chosen paint ( small, medium and large)
- Pen and Ink – heightens an artists accurate use of line, value and composition
- I love using pen as I can’t rub out and instead, use several sketchy lines
- Pencils – a range of graphite pencils normally come in a tin and typically range from HB to 6B
- Pastels are perfect for a bold life drawing class, create both linear and broad blocks of colour at speed and with expression
- charcoal – Many artists like to start their life drawing journey with charcoal as it can make lovely, large marks on paper quickly and is great for producing medium to large drawings. Choose from willow charcoal, compressed charcoal or charcoal pencils
- Graphite pencil is great for sketching, smudging can be used to add tonal value or a rubber to add light to shaded areas
- Eraser or putty rubber, you can make a pointed edge to your rubber should you need to make a bold statement by adding light to a specific spot. A putty rubber can be moulded or cut into a pointed or edged shape and allow you to remove graphite pencil shading to create drama and contour in your drawing
- Coloured pencils – I would avoid making life drawing sketches initially in coloured pencil. However, if you are creating a more finished and longer length of study, it could be nice to introduce them, working in layers of flesh tones could create a really lovely study.
- Soluble, watercolour coloured pencils or Inktense pencils by Winsor and Newton are particularly enjoyable to work with, you can introduce water with a brush and work on top of them, building up the tone of flesh gradually.
Setting Up Your Workspace
Easel or hard backed sketchbook
Some artists like to stand at an easel. When giving an easel a try, remember that your paper will be as close to vertical as possible so you will be working with your drawing arm lifted at right angles to your body. Your easel should be positioned directly in front of your model, giving you a good line of sight when you step back from your easel, you should be able to observe the whole pose.
You can work at an easel seated or standing, adjust the height so that it is directly in front of you and consider which hand you work with, you should feel comfortable enough to let your arm arc and flow across your paper.

Some artists like to get down on the floor to work, this is down to personal choice, do consider carefully your own physicality and remember that wherever you choose should not cause an obstruction or block anyone else’s view.
If you progress to drawing on the floor, you may want to take along a cushion or even some knee pads.
A range of papers and surfaces to work on
Here are my suggestions for surfaces you might like to try.
Sometimes the lesser quality papers and card scraps can be charming surfaces to draw on. Consider recycling and collaging papers together to make an interesting surface.
Try out:
- News Print
- Black Sugar paper
- Cardboard
- Cartridge paper
- Watercolour Paper
- Artists Board
Debunking Myths
There are any myths that have grown around Life Drawing and here I will tell you why they are myths.
Figurative drawing is for the super talented elite:
Absolutely not, it is my opinion that life drawing can be enjoyed by artists of all levels.
You need expensive equipment to do it justice:
No, you can start with minimal creative media, a simple pencil can suffice to make exquisite gestures of the human form and every media in between utilised effectively progressing to the finest of oil paints creating the finest of flesh tones if you find this is your preference.
You need formal training to achieve successful studies and enjoy the process:
It is wonderful to receive well informed teaching when it comes to life drawing and painting. It will help to work through your nerves, to find your flow and give you great tips and pointers on where to start, how to progress and help you work through any creative blocks.
A good teacher will give advice on foreshortening, achieving accurate proportion and guide you from getting started to adding the finer details, but there is a lot to be said for experiencing this art form afresh, without prejudice of the marks you make on your paper and in totally enjoying the freedom and joy of simply having a go!
Only drawings, paintings and studies which are anatomically correct are successful:
A common misconception might be that to be successful at life drawing, you must partake in lengthy studies and careful measuring of life and limb.
There is a very happy place to be found between gentle encouragement and enthusiastic guidance to the formality of studying Fine Art at The Royal Academy.
Life Drawing is an old fashioned and outdated practice that is demeaning to women and to men:
On the contrary, a good life drawing class treats the model with the utmost respect and decorum. The atmosphere is serene, quiet, tranquil even and only the sound of pencils should be heard.
The life model is treated as a highly respected visual subject to be captured in essence on paper, the model is without clothing but is in no way to be seen as sexual or feel their body is subject to judgement or criticism.
Further Life Drawing Tips
Keep an open mind and remember although you may have a tutor guiding you and you may be amongst artists with more experience than you but no one is judging you, so you mustn’t be so hard on yourself.
Engage in healthy critique but celebrate your achievements.
Progressing with Medium – Once you feel that you’re gaining confidence and you want to experiment further to find your preferred medium and surface to work on, you might wish to progress with watercolour, pen and ink, oils, or even take along some different papers and glue to create collages or combine lots of medium to create mixed media studies.
If you love textiles, you might wish to create drawings onto fabric which you later sew into to enhance the details of the life model.

Conclusion
As an artist, at any level, embracing the opportunity to try your hand at life Drawing is something I would advise is not to be missed. Indeed it can be transformative, informing greatly your practise as an artist.
Life drawing will help you to develop technique, boosting your knowledge of proportion and scale. It will give you consideration of autonomy, which in turn, will help you to take your experience of drawing a clothed figure to the next level and provide you with a deeper understanding of the human body and how we move, sit and lay down.
There is certainly an uplifting magic to be found in a good life drawing experience.
An experience where you get to choose your focus each time, be it form and structure, flesh and tone, detail or energy. The variety of studies, both drawing and painting (even collage or sculpture) that can be made by attending a life drawing class is limitless and exciting.
To that note I would also like to add that good life models are essential to allowing these wonderful opportunities to happen in Art colleges, Universities and in Village Halls around the country.
Speaking as an artist and teacher who has experienced life both in front of and behind the easel, if you think that you could hold a pose with dignity and poise, perhaps seek out a little advice and a little training. Research courses that require life models and the venues that would take you and then why not give life modelling a whirl.
I hope that you feel inspired to try your hand at life drawing or to develop or revisit your life drawing practice after reading my article, please do get in touch and share your work or ask any questions that I haven’t covered here and I shall endeavour to answer them.
I will end by wishing you an enlightening and enriching journey into capturing flesh and bone, muscle and form with this wonderful celebratory practice that embraces all that makes our physical, human form. Not only that but enjoy immersing yourself into a deep appreciation of the miracle that is human life as we know it.
Source link